How to Migrate from Harvest to Quanta
A step-by-step guide to moving your clients, projects, tasks, team, and full time history out of Harvest and into Quanta: one CSV export, one import wizard, and a review step that sets every new project's billing, status, and visibility at once, so ten years of finished jobs arrive tidy.
Deciding whether to leave Harvest at all? The Quanta vs Harvest page covers the 2026 price increase, what the import brings across, and what Quanta does not do yet. This guide is the how-to once you have decided.
Switching time trackers feels risky. You have years of billable hours, a tidy list of clients and projects, and a team that already knows the tool. The fear isn't the new app. It's leaving the old data behind.
Here's the good news: moving to Quanta from just about any time tracker is simple. Almost every tool, Harvest, Toggl, Clockify, FreshBooks, you name it, can export your time entries to a CSV. And a CSV is all Quanta needs. Upload that one file and the import wizard brings across your clients, projects, tasks, team members, and full time history in a single pass, and lets you review exactly what will be created before anything is saved.
To show how it works, let's walk through a real example: migrating from Harvest to Quanta, start to finish.
Updated September 2026: the review step now sets every new project at once, brings finished jobs in deactivated, and stays quick on exports with thousands of projects.
Step 1: Export your data from Harvest
In Harvest, use Export All Time to download a CSV of every time entry in your account. That single file has everything Quanta needs: one row per entry, with columns like:
Date, Client, Project, Project Code, Task, Notes, Hours,
Billable?, Invoiced?, Approved?, First Name, Last Name,
Billable Rate, Cost Rate, Currency
You don't need to rename columns or split anything apart. Export it as-is.
Want to bring over only some of your work? You have two options. You can clean up the CSV first in a spreadsheet tool, deleting rows for projects you don't want. Or you can skip that entirely: Quanta's import wizard lets you uncheck individual clients and projects before anything is saved (more on that in Step 5).
Switching time trackers is also a natural moment to tidy up, but you no longer have to choose between a clean workspace and a complete history. Bring everything, and on the review step mark the finished jobs Deactivated in one go: they stay out of the timer's pickers, while every hour on them stays on your reports and invoices. Leave out only what you genuinely never want to see again.
Step 2: Upload it to Quanta
In Quanta, go to Admin → Import and drop your CSV onto the upload area. Quanta parses the file, tells you how many data rows it found, and moves you to the next step.
Big file? Bring it. The importer is built for real exports: a ten-year Harvest account with 50,000 entries across 4,000 projects parses in the browser in about twenty seconds and imports in around seven minutes, reporting progress the whole way.
Step 3: Map the columns
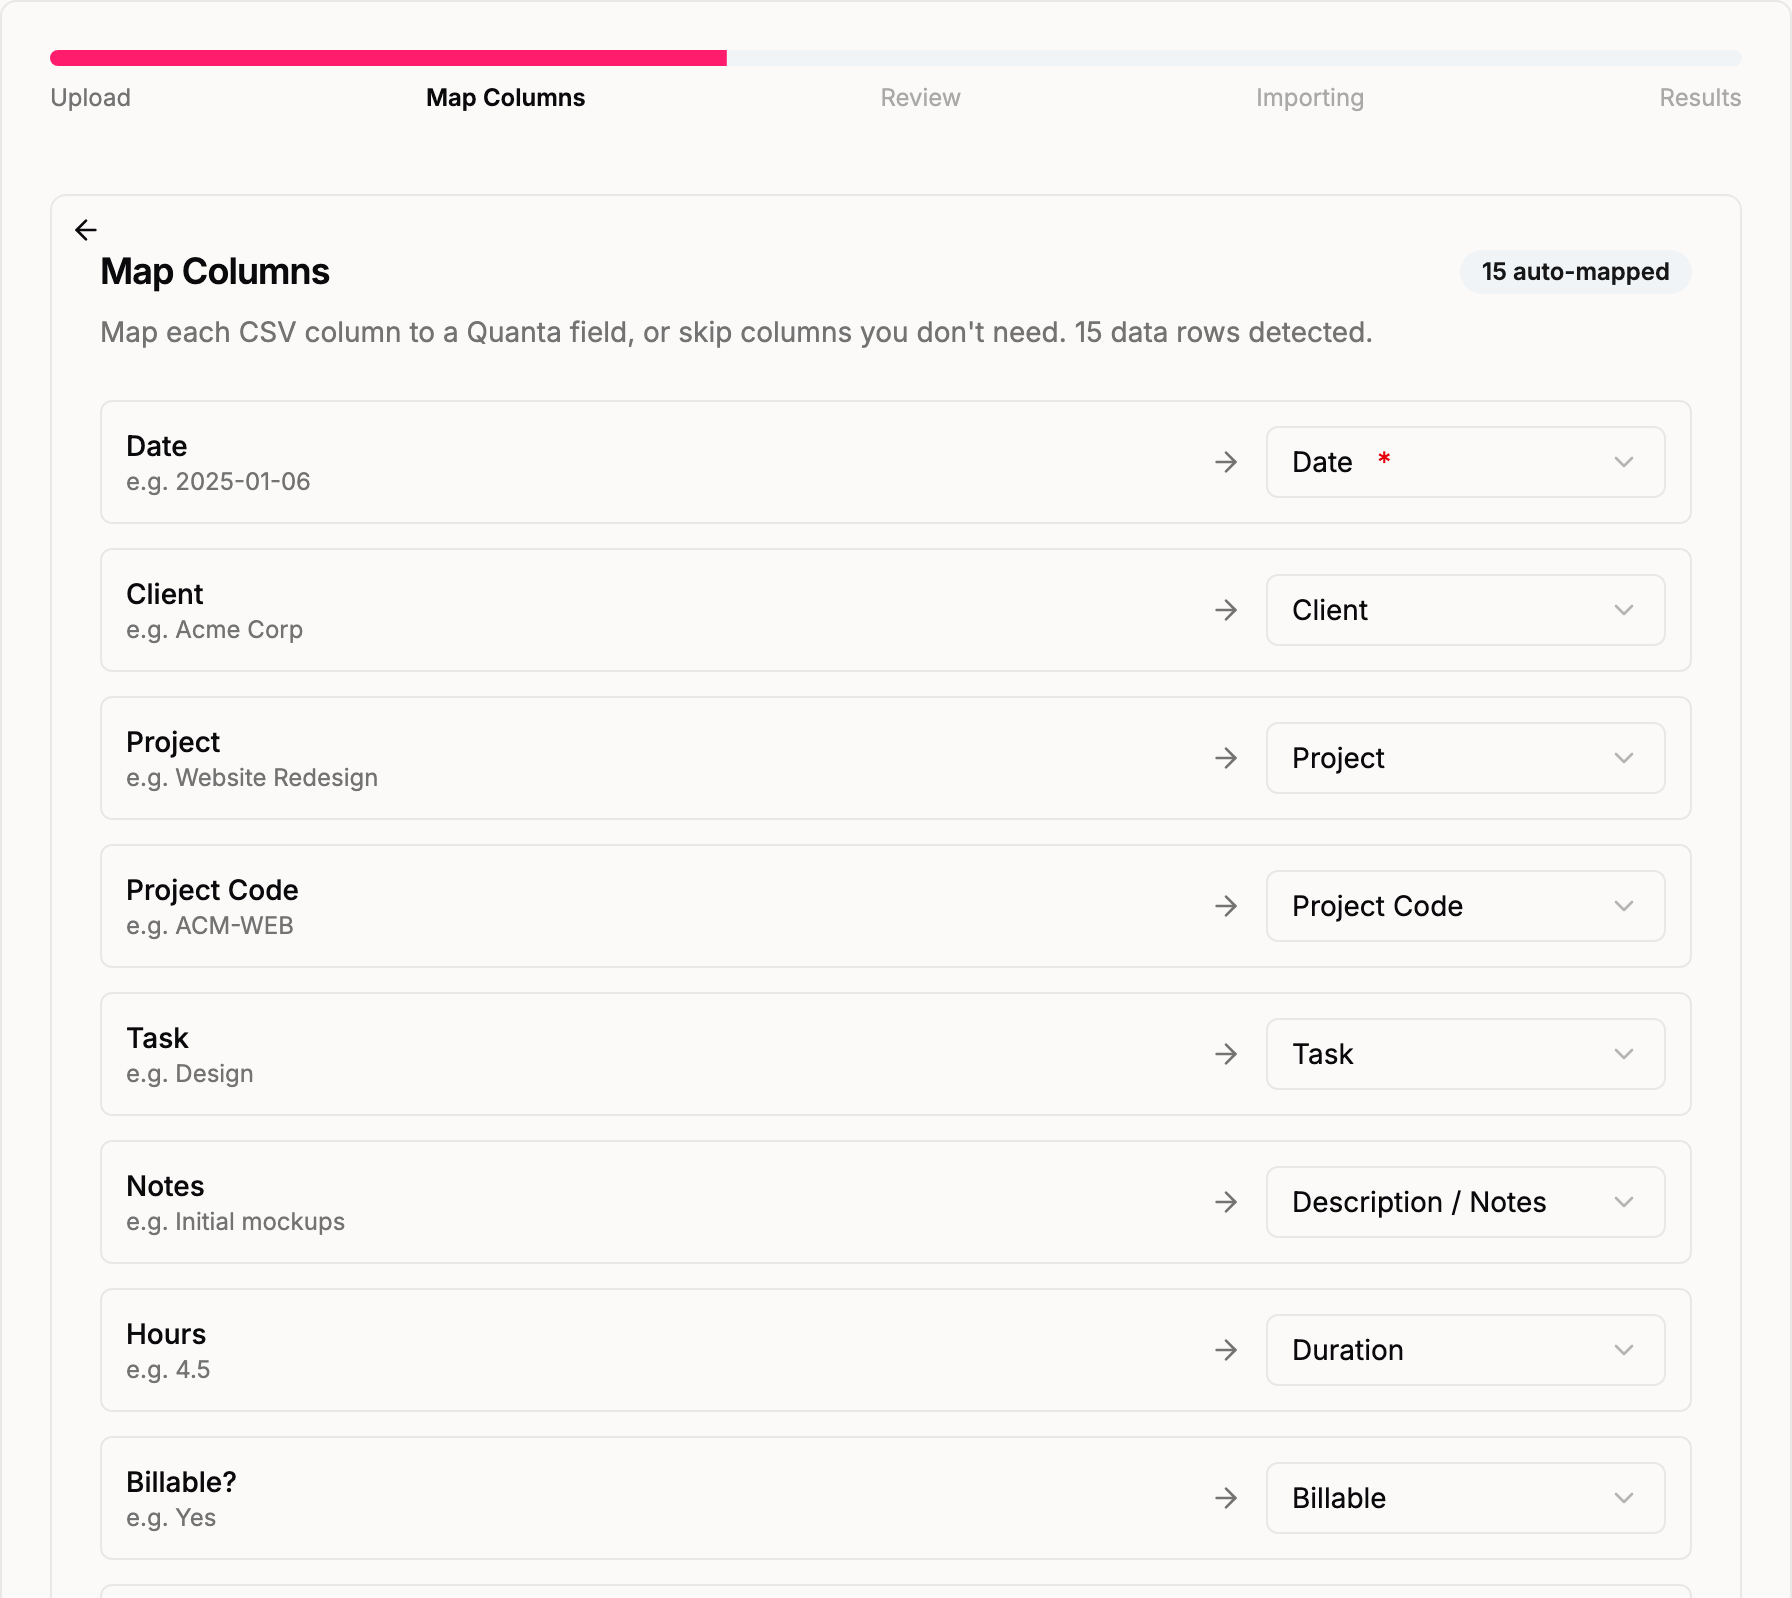
Next, Quanta lines up each column in your CSV against a field it understands. Because the import wizard recognizes Harvest's exact column names, this step is mostly already done for you:
- Hours maps to Duration
- Notes maps to Description
- Billable?, Invoiced?, and Approved? are picked up automatically
- Project Code, Billable Rate, and Cost Rate all carry over
There's one Harvest quirk worth calling out: Harvest splits people into separate First Name and Last Name columns. Quanta handles this: both columns map to the single User field at the same time, and the importer stitches them back into a full name. Nothing for you to fix.
Glance over the mapping, adjust anything that looks off, and continue.
Step 4: Match your team
If you're migrating a team, Quanta now shows every person it found in the file under Unmatched Users. For each one you get three choices:
- Map to an existing user: if that teammate is already in your Quanta workspace
- Create new user automatically: Quanta creates the account for you
- Ignore this user: skip their rows entirely
One thing to know: a Harvest export identifies people by name, not email. There's no email column in the file. So when you choose Create new user automatically, Quanta asks you to type in each new teammate's email address right there in the wizard. It needs a real address to create a working login and send the invite.
Speaking of which: when you auto-create users, a Send invites toggle is on by default, so each new teammate gets an email to set their password and log in. Turn it off if you'd rather invite people yourself later.
This is also a good moment to appreciate the pricing difference: Quanta is a flat $40/month for teams of up to 50 people, or $199/month for teams of 51 to 100, with no per-seat fees. Bringing the whole team across doesn't add a per-seat charge.
Step 5: Review what gets created
This is the step that makes migrating feel safe. Quanta shows you a clients → projects → tasks tree built from your CSV: everything it's about to create, laid out before it touches your workspace.
For each entity you can:
- Toggle it off to skip it, handy for old clients you don't want to bring over
- Map it onto something that already exists in your workspace, so you don't end up with duplicates (Quanta flags name collisions for you)
- Set the currency per client, or for every new client at once from the panel above the list
- Choose how each project bills: Hourly, Fixed fee, or Non-billable, the same three choices a project's Pricing tab offers. A Harvest export can flag a row as billable, but it has no idea what you agreed with the client, so Quanta pre-selects Hourly wherever the rows carry billable signals and Non-billable otherwise. It never guesses at a fixed fee. Pick Fixed fee, type the agreed amount, and the project comes across priced that way from its first day: its hours carry cost but no billable amount, and the fee is what you bill.
- Set billable rates, cost rates, and project codes on projects, and rates per team member. A cost rate applies to fixed-fee projects too, so you can still see what a flat-fee job cost you to deliver.
- Choose each project's status and visibility. A project can come in Active or Deactivated, and Public or Private. Finished jobs usually want to arrive deactivated, so they stay out of the timer's pickers while every hour on them stays on your reports.
- Turn repeated task names into shared tasks. Harvest tasks live per project, so a big account ends up with a separate "Design" on every project. The Shared tasks panel lists every task name that repeats across projects, or already matches something in your task library, and lets you tick the ones that should be one shared task. Share all in one click, set every new shared task's billable, common and budget settings at once, then adjust each task's default billable setting, rate, whether it's common (added to every new project) and whether it counts toward budgets. The import links every project's copy to that single library task, so "Design" is one row in your reports rather than one per project. The rest come in as ordinary per-project tasks, which you can move into the library later.
A running total at the top, "X of Y entries will be imported based on current selections", updates live as you toggle things, so you always know exactly what you're committing to.
The wizard also shows a quick summary: how many entries are ready to import, how many are duplicates of entries already in Quanta, and how many rows have errors. The Skip duplicate entries switch starts on whenever the preview found repeats, so re-running an import is safe by default; switch it off to bring every row in. Error rows are listed individually with the reason, and they're skipped without sinking the rest of the file.
Set every new project at once
Above the tree sits a panel for the settings you would otherwise repeat on every row: Currency for new clients, and Billing, Status, Visibility, Billable rate and Cost rate for new projects. Each control shows the value the new rows share, or Mixed when they differ, and picking a value applies it to everything the import will create. Projects mapped onto ones you already have keep their own settings, and any single row can still be changed afterwards.
For a migration this is where most of the work happens. Ten years of finished jobs? Pick Deactivated and Public once, and every historical project arrives out of the way but visible to the whole team. Or let the file decide: Deactivate if idle for takes a number of days, and one click deactivates every project whose newest entry is older than that while the live ones stay active. Each project row shows the month it last had time logged, so you can see why it landed where it did. New tasks does the same job for the per-project tasks, flipping them all between billable and non-billable at once.
Price your people once
Between the team matching and the tree sits Member rates: one row per person who lands on a new project, with a billable and a cost rate. Type a rate there and it goes on every new project that person belongs to, so a studio prices its people once instead of once per project. Leave a field blank to inherit the project rate, and fine-tune any single project from its Set member rates link below. Rows that already carry a rate in the CSV keep it regardless.
Working with a big export
A long Harvest history means a long tree, so the review step scales with it. Above about sixty projects the clients start folded, with a count of clients, projects and tasks alongside a search box: type part of a client or project name and only the matches show, already opened. Expand all and Collapse all do what they say, a client with hundreds of projects shows its first fifty and a Show all button, Select all and Unselect all tick or untick every client so you can start from nothing and pick the few you want, and each project's member rates sit behind a Set member rates link until you need them. Rows only render when you open them, so opening a dropdown or typing a rate stays instant however big the file.
Step 6: Run the import
Hit the import button and Quanta gets to work. The progress view counts through each phase, projects, then tasks, then entries a thousand at a time, and once it has a rate it says roughly how long the step has left, so a long import never looks stuck. The work runs on the server, so you can close the tab or refresh and the page picks the import up where it is. When it's done, the results screen confirms what was created and links straight to the Deactivated tab and the task library.
Here's what Quanta preserves faithfully from Harvest:
- Per-entry rates: Quanta imports the billable and cost rate from each row and stamps it directly onto that entry, so every historical entry carries the rate it was logged at. The billable and cost amounts are then calculated automatically as hours × rate, and a row that came over as non-billable keeps a zero billable amount even if it has a cost rate. One thing to keep in mind: if you later update a project or team member rate and choose to apply it to historic time entries, that change will overwrite the imported rates on those entries, so leave historic entries out of the update if you want your migrated rates left exactly as they came across
- The project's billing wins over the row's flag: on a project you imported as fixed fee or non-billable, rows come in with their cost but no billable amount, even where Harvest marked them "Billable? = Yes". Otherwise a flat-fee job would show hours waiting to be invoiced that the fee already covers. The same goes for rows you map onto a project that already exists: the project keeps how it bills, and the review step warns you when billable rows are about to land on one that does not bill by the hour
- Dates: a Harvest row carries a date but no clock time, so each entry lands at noon in your workspace's timezone. That keeps it on the same calendar day in your reports and timesheets wherever the import was run from, including a workspace in New Zealand, where noon UTC would already be tomorrow
- Invoiced work: rows marked
Invoiced? = Yesin Harvest come in flagged as already billed, so the billed status from your old tool carries over from day one - Approved time: rows marked
Approved? = Yescome in locked, matching their state in Harvest
Not happy with the result? Undo it
The review step catches most problems before they happen, but not all of them. Maybe you ran the whole import, looked at the result, and realized a column mapped subtly wrong, or that you'd rather reorganize your projects before bringing the history across. Imports can go sideways, and that's normal.
So every import gets an undo. The results screen offers Undo this import as soon as it finishes, and the same button sits on the Recent imports list on the Import page, where each import is recorded with when it ran, who ran it and what it brought in. Undo removes exactly what that import created: its entries, projects, clients, tasks, shared tasks and tags. Anything your workspace has used since stays where it is, so a project with time logged after the import keeps its place, and so does a client with newer projects. People the import created stay too, since they may already have signed in, and entries that have made it onto an invoice block the undo until those invoices are voided. The list then shows what was removed and what had to stay.
For a true clean slate there is still Purge All Data on the same page, which clears the workspace back to empty, time entries, projects, clients, tasks, tags and invoices, in a single step. Because it's destructive, the purge makes you type your workspace name to confirm and spells out exactly what it will remove first. Review, import, undo, retry: do it as many times as it takes to get the result you actually want, without deleting hundreds of entries by hand or spinning up a throwaway workspace.
After the move
Once the import finishes, take a few minutes to settle in:
- Open Projects and Clients to confirm everything came across, and check the Fixed fee badge sits on the right ones
- If you brought history in deactivated, it lives under the Deactivated tab on Projects. Reactivate any job that turns out to still be live
- Open Tasks to see the shared task library the import built, and mark the ones every new project should start with as common
- Check Reports: filter by date range, client, or project to spot-check your history
- Invite anyone the import didn't auto-create, and set up tags for how your team likes to categorize work
- Start tracking with one-click timers, weekly grid entry, or AI logging
That's it. Your history is in, your team is in, and you're tracking in Quanta, without leaving a single billable hour behind in Harvest.
We used Harvest here, but the process is the same whatever you're coming from: export a CSV, upload it, review, import. If your current tool can produce a CSV of time entries, and nearly all of them can, Quanta can bring it in.
Start your migration for free, no credit card required.